원문 : 호롤리한하루/Openshift4.3 Installation on Baremetal
Overview
꽤 오랜만에 하는 포스팅입니다. 나태해진건...아니고 그 동안 Openshift4 UPI를 수련하고 왔습니다.Openshift3에서 4로 버전이 올라가면서 설치방법이 많이 바뀌었습니다. 원래는 Ansible로 설치하면 끝이였고 운영체제도 RHEL을 사용하는 방법이었는데 이제는 openshift-installer를 사용하고 운영체제도 RHCOS를 사용해야합니다. (container runtime도 docker에서 cri-o로 바뀌었죠)
설치방법도 익숙치 않고, 예전보다 건드려야할 부분들이 많아서 예상보다 테스트하는데 시간이 더 오래걸린 것 같습니다.
오늘 포스팅할 내용은 제목그대로 Openshift4 Baremetal Installation입니다.
집에서 개인 클러스터를 구축해 테스트 할 수 있도록 VirtualBox를 사용하는 방법을 설명드리겠습니다.
참고링크 : RedHat Openshit/4.3/Installing a cluster on bare metal
Prerequisites
사용할 머신의 스펙(집컴)
- 8 CPU
- 32GB RAM
- x86_64
- Window10 pro
근데 직접 설치 진행해보니까 이 스펙으로는 부족합니다. 적어도 ram이 16GB는 더있어야 될 것 같네요..
테스트용도로만 봐주시기 바랍니다!
+) redhat 계정도 필요합니다
설치 순서
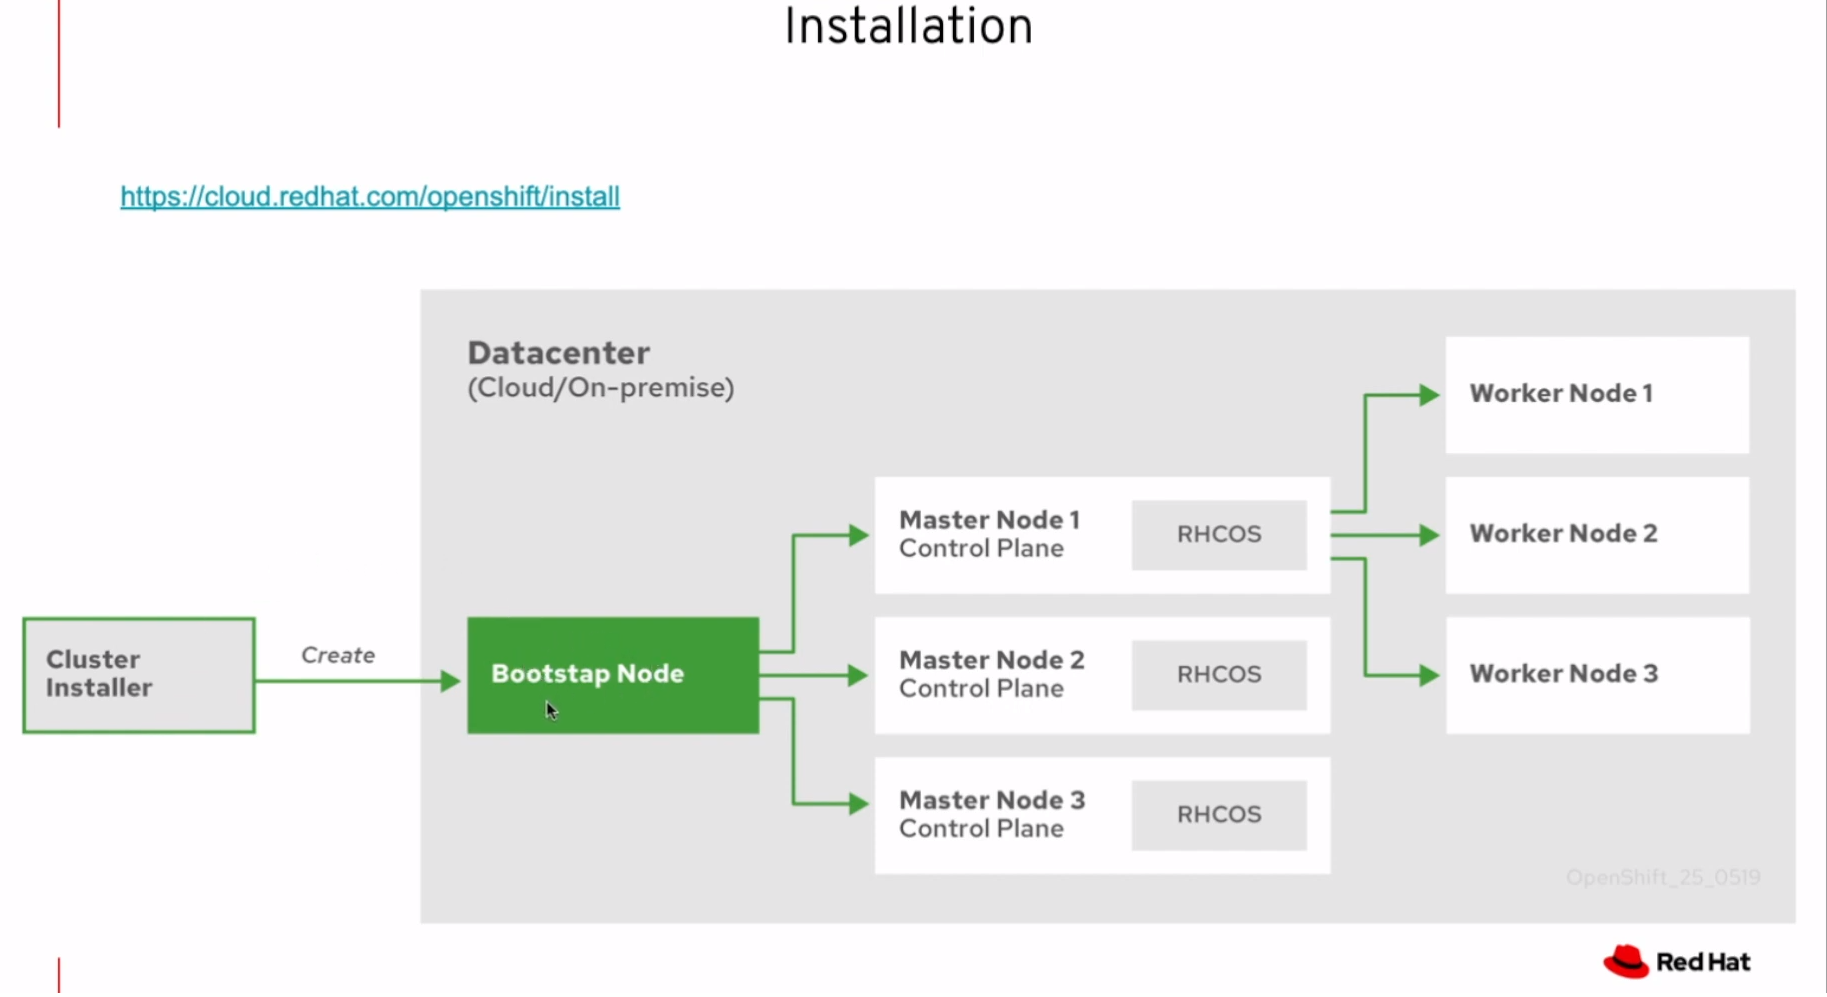
설치 순서는 다음과 같습니다.
- Bootstrap 노드 생성, 해당 노드는 마스터 노드 부팅에 필요한 리소스를 제공해줌
- 마스터는 리소스를 bootstrap노드에서 가져와 부팅을 마침
- 마스터는 bootstrap 노드를 사용해 etcd 클러스터를 구성
- bootstrap노드는 etcd클러스터를 사용해 임시 쿠버네티스 컨트롤플레인을 시작
- 임시 컨트롤플레인은 진짜 컨트롤플레인을 마스터 머신에 올림
- 임시 컨트롤플레인은 꺼지고 마스터머신의 컨트롤플레인으로 컨트롤 권한이 옮겨감
- bootstrap노드는 마스터머신의 컨트롤플레인에 openshift component들을 넣음
- Installer는 bootstrap노드를 다운시킴
준비단계
일단 클러스터를 구성하는데 있어 최소 구성요건은 다음과 같습니다.
| Machine | os | vCPU | RAM | Storage | number |
|---|---|---|---|---|---|
| Bootstrap | RHCOS | 4 | 16GB | 120GB | 1개 |
| Control plane | RHCOS | 4 | 16GB | 120GB | 3개 |
| Compute | RHCOS or RHEL7.6 | 2 | 8GB | 120GB | 2개 |
그냥 봐도 리소스가 엄청 많이 필요합니다.
이 클러스터를 구성하기 위해 별도의 서버가 하나 더 필요한데, 이런 서버를 Bastion이라고 보통 부릅니다.
이번 포스팅에서 사용할 서버들의 전체 아키텍처를 그리면 다음과 같습니다.
왜 각 노드들이 바스티온노드에 라우트포워딩을 하는지는 뒤에서 마저 설명드리겠습니다.
VirtualBox에서 생성한 노드들의 정보 :
| hostname | ip | os | vCPU | RAM | Storage | net |
|---|---|---|---|---|---|---|
| ocp-dns(bastion) | 192.168.56.114 | CentOS 7 | 2 | 4GB | 50GB | 호스트전용어댑터&NAT |
| bootstrap.tests.hololy.local | 192.168.56.200 | RHCOS4.3.8 | 4 | 16GB | 120GB | 호스트전용어댑터 |
| master01.tests.hololy.local | 192.168.56.201 | RHCOS4.3.8 | 4 | 16GB | 120GB | 호스트전용어댑터 |
| master02.tests.hololy.local | 192.168.56.202 | RHCOS4.3.8 | 4 | 16GB | 120GB | 호스트전용어댑터 |
| master03.tests.hololy.local | 192.168.56.203 | RHCOS4.3.8 | 4 | 16GB | 120GB | 호스트전용어댑터 |
| worker01.tests.hololy.local | 192.168.56.204 | RHCOS4.3.8 | 2 | 8GB | 120GB | 호스트전용어댑터 |
| worker02.tests.hololy.local | 192.168.56.205 | RHCOS4.3.8 | 2 | 8GB | 120GB | 호스트전용어댑터 |
bastion까지 총 7대의 노드가 필요합니다.
VirtualBox Network 정보 : IT개발정보정리/[VirtualBox] 네트워크 설정
VirtualBox에서 vm을 생성할 때, 각 노드들은 반드시 인터넷연결이 되어있어야 합니다.
근데, 호스트전용어댑터 설정과 NAT을 동시에 설정하게되면 네트워크 인터페이스가 두개가 되어버립니다.
rhcos가 설치될 때 hostname이 제대로 잡히면 상관없지만, (이유는 모르겠지만)NAT의 인터페이스를 기준으로 hostname을 설정하게됩니다... 그 외에도 라우트관련 문제도 생기게되고 여러모로 복잡한 상황이 발생하게 됩니다.
즉 인터페이스를 단일화 시킴과 동시에 각 노드는 인터넷 연결이 되게 해야합니다.
그래서 호스트전용어댑터만 살리고 network통신을 ocp-dns(bastion)으로 라우트시키는 방법을 쓰기로 했습니다.
# bastion vm에서 실행
$ sysctl net.ipv4.ip_forward=1
$ iptables -t nat -A POSTROUTING -s 192.168.56.0/24 -j MASQUERADE
아마 이것보다 깔끔한 방법이 있을 것 입니다. 각 노드가 네트워크통신이 되고, 노드끼리 통신이 가능하기만 하면 되니 이부분은 참고만 해주세요.
Bastion Configuration
바스티온 서버에서 해야할 일은 크게 3가지정도입니다.
DNS(PXE부팅일경우 dnsmasq), LoadBalancer, HTTP 구성입니다.
본문에서는 iso파일을 통한 부팅을 주로 다루고, 본문이후에 PXE부팅에 대한 것을 기술하겠습니다.
DNS 설정
클러스터 노드들이 사용할 domain을 설정해줄겁니다.
- 클러스터 이름 :
tests - domain :
hololy.local
정방향과 역방향 모두 설정해줍니다.
zone추가 (/etc/named.rfc1912.zones)
zone "hololy.local" IN {
        type master;
        file "hololy.local.zone";
        allow-update { none; };
};

zone "56.168.192.in-addr.arpa" IN {
        type master;
        file "reverse.hololy.local";
        allow-update { none; };
};
정방향DNS (/var/named/hololy.local.zone)
$TTL 1D
@   IN SOA  @ hololy.local. (
                    20200520   ; serial
                    1D  ; refresh
                    1H  ; retry
                    1W  ; expire
                    3H )    ; minimum
    IN NS   hololy.local.
    IN A    192.168.56.114
ns  IN A    192.168.56.114

;cluster name
tests   IN CNAME    @

;ocp cluster
bootstrap.tests.hololy.local.   IN  A   192.168.56.200
master01.tests.hololy.local. IN  A   192.168.56.201
master02.tests.hololy.local. IN  A   192.168.56.202
master03.tests.hololy.local. IN  A   192.168.56.203
worker01.tests.hololy.local. IN  A   192.168.56.204
worker02.tests.hololy.local. IN  A   192.168.56.205


;ocp internal cluster ip
etcd-0.tests.hololy.local.  IN A    192.168.56.201
etcd-1.tests.hololy.local.  IN A    192.168.56.202
etcd-2.tests.hololy.local.  IN A    192.168.56.203

api-int.tests   IN CNAME    @
api.tests   IN CNAME    @
*.apps.tests    IN CNAME    @
apps.tests  IN CNAME    @

console-openshift-console.apps.tests.hololy.local.  IN  A   192.168.56.114
oauth-openshift.apps.tests.hololy.local.    IN  A   192.168.56.114

;ocp srv records
_etcd-server-ssl._tcp.tests.hololy.local.   86400   IN   SRV    0   10  2380    etcd-0.tests.hololy.local.
_etcd-server-ssl._tcp.tests.hololy.local.   86400   IN   SRV    0   10  2380    etcd-1.tests.hololy.local.
_etcd-server-ssl._tcp.tests.hololy.local.   86400   IN   SRV    0   10  2380    etcd-2.tests.hololy.local.
역방향DNS (/var/named/reverse.hololy.local)
$TTL 900
@ IN SOA hololy.local. root.hololy.local. (

    20200520;
    86400;
    3600;
    86400;
    3600;

)

    IN NS hololy.local.
    IN A 192.168.56.114

114 IN PTR hololy.local.

200 IN PTR bootstrap.tests.hololy.local.
201 IN PTR master01.tests.hololy.local.
202 IN PTR master02.tests.hololy.local.
203 IN PTR master03.tests.hololy.local.

204 IN PTR worker01.tests.hololy.local.
205 IN PTR worker02.tests.hololy.local.

114 IN PTR api.tests.hololy.local.
114 IN PTR api-int.tests.hololy.local.
역방향 DNS를 설정해주지 않으면, 노드들이 자신의 hostname을 찾지못하는 오류가 날 수 있기 때문에 반드시 설정해주셔야합니다.
확인
zone파일들의 권한을 바꿔주고
$ chown root.named /var/named/hololy.local.zone
$ chown root.named /var/named/reverse.hololy.local
제대로 설정되었는지 확인하겠습니다.
$ named-checkzone hololy.local /var/named/hololy.local.zone
zone hololy.local/IN: loaded serial 200522
OK

$ named-checkzone hololy.local /var/named/reverse.hololy.local
zone hololy.local/IN: loaded serial 200522
OK
둘다 OK가 뜨면 named서비스를 재시작 시킵니다.
$ systemctl restart namednslookup으로 제대로 적용되었는지 확인하겠습니다.
$ nslookup
> hololy.local
Server:         192.168.56.114
Address:        192.168.56.114#53

Name:   hololy.local
Address: 192.168.56.114
HTTP file 서버 설정
RHCOS가 설치될때 raw파일을 http GET으로 끌어와서 설치를 마무리짓습니다.
이 때 사용될 http file서버를 구축해보겠습니다.
여러가지를 사용할 수 있겠지만 저는 LB로도 쓸수있는 Nginx를 쓰도록 하겠습니다.
$ sudo yum install -y nginx
$ systemctl start nginx
$ systemctl enable nginx
Nginx의 default.conf파일을 수정해줍니다.
$ vim /etc/nginx/conf.d/default.conf

server {
    listen       8080;
    server_name  localhost;


    location / {
        root   /usr/share/nginx/html/files;
        autoindex on;
    }

    error_page   500 502 503 504  /50x.html;
    location = /50x.html {
        root   /usr/share/nginx/html;
    }

}
변경해야 할 부분은 세군데입니다.
- 80포트 -> 8080포트로 변경
location /에 파일서버로 사용할 경로추가autoindex on추가
파일서버로 사용할 경로를 생성하고, 비어있는 파일을 생성해서 테스트하겠습니다.
$ mkdir /usr/share/nginx/html/files
$ touch /usr/share/nginx/html/files/hi

$ systemctl reload nginx
Nginx 서버의 ip와 8080포트로 접근해보면 hi라는 파일이 생긴 것을 확인할 수 있습니다.
LB(LoadBalancer) 설정
마지막으로 LB를 설정해줘야합니다.
/etc/nginx/nginx.conf에 가서 새롭게 만들 conf파일의 디렉토리를 추가시켜주겠습니다.
$ mkdir /etc/nginx/tcpconf.d
$ vim /etc/nginx/tcpconf.d/lb.conf
stream{
upstream ocp_k8s_api {
#round-robin;
server 192.168.56.201:6443; #bootstrap
server 192.168.56.202:6443; #master1
server 192.168.56.203:6443; #master2
server 192.168.56.204:6443; #master3
}
server {
listen 6443;
location / {
proxy_pass ocp_k8s_api;
}
}
upstream ocp_m_config {
#round-robin;
server 192.168.56.201:22623; #bootstrap
server 192.168.56.202:22623; #master1
server 192.168.56.203:22623; #master2
server 192.168.56.204:22623; #master3
}
server {
listen 22623;
location / {
proxy_pass ocp_m_config;
}
}
upstream ocp_http {
#round-robin;
server 192.168.56.201:80; #master1
server 192.168.56.202:80; #master2
server 192.168.56.203:80; #master3
server 192.168.56.204:80; #worker1
server 192.168.56.205:80; #worker2
}
server{
listen 80;
proxy_pass ocp_http;
}
upstream ocp_https {
#round-robin;
server 192.168.56.201:443; #master1
server 192.168.56.202:443; #master2
server 192.168.56.203:443; #master3
server 192.168.56.204:443; #worker1
server 192.168.56.205:443; #worker2
}
server{
listen 443;
proxy_pass ocp_https;
}
}위 로드밸런서는 http용이 아니라 tcp/udp용 로드밸런서입니다. 때문에 기존의 conf.d자리에 들어가면 안됩니다.
/etc/nginx/nginx.conf로 이동해서 기존 conf.d가 include되어있던 http블럭 밑에 tcpconf.d폴더를 include시켜주겠습니다.
…
http {
    include       /etc/nginx/mime.types;
    default_type  application/octet-stream;

    log_format  main  '$remote_addr - $remote_user [$time_local] "$request" '
                      '$status $body_bytes_sent "$http_referer" '
                      '"$http_user_agent" "$http_x_forwarded_for"';

    access_log  /var/log/nginx/access.log  main;

    sendfile        on;
    #tcp_nopush     on;

    keepalive_timeout  65;

    #gzip  on;

    include /etc/nginx/conf.d/*.conf;
    charset utf-8;
}
include /etc/nginx/tcpconf.d/*.conf;
설정을 마무리지었다면 nginx서비스를 reload시켜줘서 업데이트시켜줍니다.
$ systemctl reload nginx나타날 수 있는 에러
SELINUX가 enable인경우
bind() to 0.0.0.0:6443 failed (13: Permission denied)이런 에러가 발생할 수 있습니다.
이럴땐
semanage커맨드를 통해 포트를 열어주면 됩니다.$ sudo semanage port -l |grep http_port_t http_port_t tcp 80, 81, 443, 488, 8008, 8009, 8443, 9000 $ semanage port -a -t http_port_t -p tcp 6443 $ semanage port -a -t http_port_t -p tcp 22623포트 추가해주고 nginx서비스 restart해주면 해결!
Installer 설치
Openshift를 설치할 installer와 각종 툴들을 설치하겠습니다.
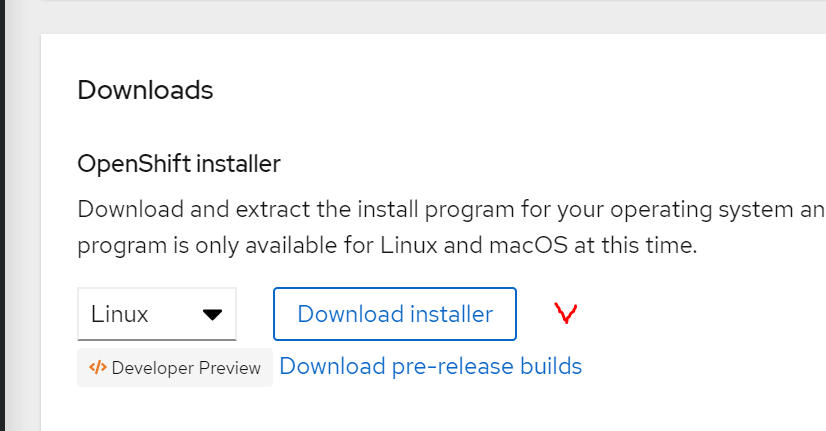
Openshift-Installer
https://cloud.redhat.com/openshift/install
위 링크로 이동하면 각 Infrastructure에 필요한 installer를 받을 수 있는 페이지를 볼 수 있습니다.
지금 포스팅에서 진행하고 있는 것은 baremetal설치이므로 "Run on BareMetal"메뉴를 클릭합니다.
스크롤을 내리다보면 installer다운받는 부분을 확인할 수 있습니다.
Download Installer 버튼의 링크를 복사해 wget으로 다운받겠습니다.
$ tar -xvf openshift-install-linux.tar.gz

$ ./openshift-install version
openshift-install 4.3.21
built from commit 7bc8168fbba1c831ac1b25c858f4f56cd7468801
release image quay.io/openshift-release-dev/ocp-release@sha256:919e2405322cf497165d58fbd064ddddcad1651c367362cfea078e4469803005
Tool(oc, kubectl)설치
위와 같은 방식으로 툴을 다운받습니다.
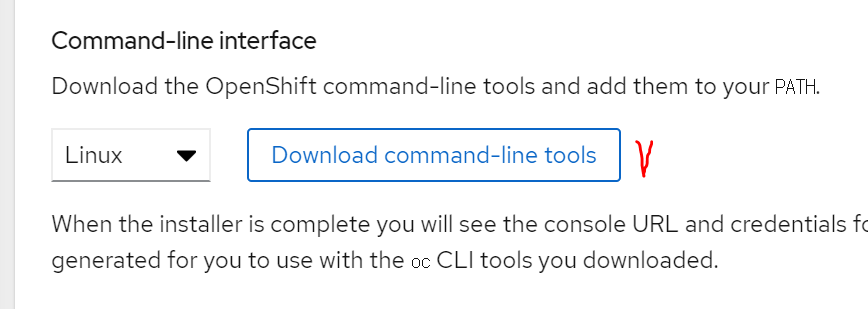
$ tar -xvf openshift-client-linux.tar.gz
$ cp ./kubectl /usr/local/bin/kubectl
$ cp ./oc /usr/local/bin/oc

$ oc version
Client Version: 4.3.9

$ kubectl version
Client Version: version.Info{Major:"", Minor:"", GitVersion:"v0.0.0-master+$Format:%h$", GitCommit:"$Format:%H$", GitTreeState:"", BuildDate:"1970-01-01T00:00:00Z", GoVersion:"go1.12.12", Compiler:"gc", Platform:"linux/amd64"}
Pull Secret 복사
같은 페이지의 pull secret을 복사해서 어딘가에 적어둬야합니다.
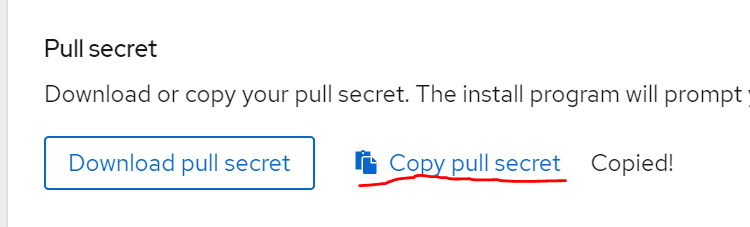
이 secret파일은 quay.io와 같은 서비스에 인증하게 해줍니다.
설치할때 반드시 필요한 secret키이며 24시간 내에 만료되기 때문에 설치도 24시간안에 마무리지어야만 합니다.
ssh key생성
만들 vm에 인증을 위해 키를 생성해주겠습니다.
$ ssh-keygen
Generating public/private rsa key pair.
Enter file in which to save the key (/root/.ssh/id_rsa):
Enter passphrase (empty for no passphrase):
Enter same passphrase again:
Your identification has been saved in /root/.ssh/id_rsa.
Your public key has been saved in /root/.ssh/id_rsa.pub.
The key fingerprint is:
SHA256:74Hc6wjgA1ErMNoixDCdKmQR821ENJcqwf4QNBKzGxA root@ocp.ibm.cloud
The key's randomart image is:
+---[RSA 2048]----+
|E@*++= ..        |
|+OO=+.o.         |
|*+=.+o.          |
|+.o*..           |
|... =   S        |
|   o o . +       |
|    o . o +      |
|     . . o o     |
|        ..+      |
+----[SHA256]-----+
Installation
이제부터 설치를 본격적으로 진행하겠습니다.
먼저 설치폴더를 만들어줍니다.
$ mkdir installation_directory
$ cd installation_directory
Manually creating the installation configuration file
설치할때 쓸 설정파일을 만들어주겠습니다.
이름은 install-config.yaml로 작성해야합니다.
apiVersion: v1
baseDomain: hololy.local
compute:
- hyperthreading: Enabled
  name: worker
  replicas: 0
controlPlane:
  hyperthreading: Enabled
  name: master
  replicas: 3
metadata:
  name: tests
networking:
  clusterNetwork:
  - cidr: 10.128.0.0/14
    hostPrefix: 23
  networkType: OpenShiftSDN
  serviceNetwork:
  - 172.30.0.0/16
platform:
  none: {}
fips: false
pullSecret: '{"auths": ...}'
sshKey: 'ssh-ed25519 AAAA...'
수정해야할 부분은 baseDomain과 pullSecret, sshKey입니다.
baseDomain은 DNS 구성파일을 작성할때 적었던 domain으로 적어주고
pullSecret은 위에서 복사했던 secret,
sshKey도 위에서 생성했던 key의 public키를 복사해주면 됩니다.
worker의 replica가 0개인이유 : UPI에서는 제대로 동작하지 않는 파라미터이며, worker들은 반드시 manually하게 추가시켜줘야합니다.
참고링크 : Sample install-config.yaml file for bare metal
Creating the Kubernetes manifest and Ignition config files
이제 manifest파일과 ignition파일들을 생성해줄차례입니다.
Kubernetes Manifest파일 생성
$ ./openshift-install create manifests --dir=installation_directory/
INFO Consuming Install Config from target directory
WARNING Making control-plane schedulable by setting MastersSchedulable to true for Scheduler cluster settings

$ ls installation_directory/
manifests  openshift
manifests폴더가 생성되고 그 안에 각종 manifest파일이 생성되는 것을 확인할 수 있습니다.manifests/cluster-scheduler-02-config.yml 파일을 보면 mastersSchedulable라는 파라미터가 있습니다.
이 파라미터는 default로 True이고, 해당 파라미터가 True이면 Master에 pod이 스케줄링될 수 있으며 Master가 Worker의 역할까지 하게 됩니다. 이 경우 불완전하지만 마스터3개만으로 클러스터를 구성할 수도 있긴 합니다. 하지만 마스터노드의 리소스요구량이 더 커지며 권장하지 않는 방법입니다.
False로 바꾸게되면 Master는 컨트롤플레인의 역할만 하게 되며, Worker가 추가로 필요합니다.
False로 두는것이 권장사양이므로 False로 수정하고 설치를 진행하겠습니다.

Ignition파일 생성
coreos를 초기 구성하는데 필요한 파일입니다.
위 kubernetes manifest파일 수정이 완료되었으면 ignition파일을 생성해주도록 합니다.
$ ./openshift-install create ignition-configs --dir=installation_directory/
INFO Consuming OpenShift Install (Manifests) from target directory
INFO Consuming Worker Machines from target directory
INFO Consuming Master Machines from target directory
INFO Consuming Openshift Manifests from target directory
INFO Consuming Common Manifests from target directory

$ ls dir/
auth  bootstrap.ign  install-config.yaml.bak  master.ign  metadata.json  worker.ign
마지막으로 ignition파일들을 아까 만들었던 nginx 파일서버로 옮기겠습니다.
$ cp dir/*.ign /usr/share/nginx/html/files/파일 권한도 외부에서 다운받을수 있게 644로 변경해줍니다.
$ chmod 644 /usr/share/nginx/html/files/*.ignraw파일 다운로드
그 다음 RHCOS의 raw파일과 iso도 다운받아줍니다.
mirror서버에서 확인할 수 있습니다.
ISO : rhcos-<version>-installer.<architecture>.iso
Compressed metal RAW : rhcos-<version>-metal.<architecture>.raw.gz
두가지만 받으면 됩니다, iso파일은 호스트 컴퓨터에 받아서 VirtualBox에 vm만들때 사용할거고 raw파일은 RHCOS 부팅할 때 HTTP파일서버에서 직접 다운로드해서 사용할겁니다.
바스티온의 파일서버에서 raw파일을 다운받아주겠습니다.
$ cd /usr/share/nginx/html/files/
$ wget https://mirror.openshift.com/pub/openshift-v4.......raw.gz
Creating Red Hat Enterprise Linux CoreOS (RHCOS) machines
만든 vm중 bootstrap용으로 사용할 vm을 부팅시킵니다.

초기화면에서 e나 tab키를 누르고 install 파라미터를 집어넣어줘야합니다.
coreos.inst.install_dev=sda
coreos.inst.image_url=http://192.168.56.114:8080/rhcos438.raw.gz
coreos.inst.ignition_url=http://192.168.56.114:8080/bootstrap.ign
ip=192.168.56.200::192.168.56.114:255.255.255.0:bootstrap.tests.hololy.local:enp0s3:none
nameserver=192.168.56.114
coreos.inst.install_dev : 설치진행할 하드디스크이름coreos.inst.image_url : raw파일 url (nginx의 파일서버 ip)coreos.inst.ignition_url : ignition파일의 url (어떤 ignition파일을 쓰느냐에 따라 해당 vm의 역할이 바뀝니다)ip : {static ip}::{gateway}:{netmask}:{hostname}:{network interface}:nonenameserver : 사용할 네임서버 ip
다 작성해주고 설치 시작!

이런 비슷한 로그가 뜨면서 설치가 진행됩니다.
계속 기다리면 로그인화면이 뜹니다.
바스티온 vm에서 ssh core@192.168.56.200로 접속해도 되고 호스트에서 putty나 mobaXterm같은 터미널로 접속해도 됩니다.
id는 core로 고정이고 password는 install-config.yaml파일 만들때 사용했던 public key의 짝꿍 private키를 가지고 로그인하시면 됩니다.

확인해야 할 것들!!!
- 인터넷이 연결되었는지 테스트 (
ping 1.1.1.1) - hostname이 제대로 설정되었는지 (
bootstrap.tests.hololy.local)
전부 정상이면 마음놓고 마스터를 만들러가셔도 됩니다.
$ journalctl -b -f -u bootkube위 커맨드를 통해 현재 부트스트랩 노드가 어떤일을 하고 있는지 로그를 확인할 수 있습니다.
마스터가 전부 뜨기 전까지는 다음과 비슷한 로그가 반복됩니다.
다음은 계속 반복작업입니다. 손으로 일일히 타이핑해야해서 매우 귀찮습니다...
마스터 3대를 작동시키고나서 부트스트랩과 동일하게 인터넷이 연결되어있는지, 호스트네임이 정상인지 확인해주고 바스티온으로 가서 wait-for bootstrap-complete 커맨드를 켜놓고 기다려야 합니다.
문제없이 마스터 노드가 부트된다면 다음과 같은 결과를 보실 수 있습니다.
$ ./openshift-install wait-for bootstrap-complete  --log-level=info --dir=installation_directory/
INFO Waiting up to 30m0s for the Kubernetes API at https://api.tests.hololy.local:6443...
INFO API v1.16.2 up
INFO Waiting up to 30m0s for bootstrapping to complete...
INFO It is now safe to remove the bootstrap resources
부트스트랩 로그에서는 다음 로그를 보실 수 있습니다.
부트스트랩이 성공적으로 끝나게 되면 다음 옵션을 마스터에 추가한 후 리부트시켜줍니다.
$ sudo vi /etc/sysctl.conf
net.ipv4.ip_no_pmtu_disc = 1

$ sudo sysctl -p
$ sudo reboot
그 다음 워커2대도 부팅시켜주세요.
워커 부팅 이후에 자동으로 붙지 않기때문에 수동으로 워커노드를 허가해주는 작업이 필요합니다.
$ oc get csr
csr을 출력하면 Pending상태인 csr을 확인하실수있습니다.
수동으로 approve를 시켜줘야 워커가 클러스터에 붙을 수 있습니다.
$ oc adm certificate approve csr-nqn6g전부 마치면 한 30~40분정도 기다려야 합니다.wait-for install-complete커맨드를 통해 확인할 수도 있지만 watch -n5 oc get clusteroperators를 통해서도 실시간으로 작업진행을 확인할 수 있습니다.
$ watch -n5 oc get clusteroperators
모든 항목이 위 사진과 같이 True False False가 떠야지 설치가 완료된 것입니다.
$ ./openshift-install wait-for install-complete --dir=installation_directory/
INFO Waiting up to 30m0s for the cluster at https://api.s.hololy.local:6443 to initialize...
INFO Waiting up to 10m0s for the openshift-console route to be created...
INFO Install complete!
INFO To access the cluster as the system:admin user when using 'oc', run 'export KUBECONFIG=/root/ocp4/installation_directory/auth/kubeconfig'
INFO Access the OpenShift web-console here: https://console-openshift-console.apps.s.hololy.local
INFO Login to the console with user: kubeadmin, password: t45T1-LS3zi-HIcLS-f3C7F
설치 완료!!
호스트머신에서 dns를 해당 클러스터에서 사용하는 dns로 바꿔주고 웹에서 콘솔을 접속해보면 다음 화면을 확인하실 수 있습니다.
야-호---!
Appendix. PXE부팅
네트워크부팅에대해서 설명드리겠습니다.
위의 방법은 iso와 raw파일을 사용해 일일히 커맨드를 쳐줘야하는 불편함이 있었지만 pxe부팅에서는 그런 불편함이 없어질겁니다.
우선 환경은 위와 동일하고, HTTP와 LB설정까지 마쳐주세요.
그다음 vm생성할 때, mac주소를 다 적어놔주세요.
네트워크의 고급에서 확인할 수 있습니다.
바스티온서버에서 dns는 쓰지 않을거니 stop시켜주고
$ systemctl stop nameddnsmasq를 설치해줍니다.
$ yum install dnsmasq

$ vim /etc/dnsmasq.d/ocp.conf
interface=enp0s3
domain=tests.hololy.local
srv-host=_etcd-server-ssl._tcp,etcd-0.tests.hololy.local,2380,0,10
srv-host=_etcd-server-ssl._tcp,etcd-1.tests.hololy.local,2380,0,10
srv-host=_etcd-server-ssl._tcp,etcd-2.tests.hololy.local,2380,0,10
#로드밸런서를 가리킴
address=/.apps.tests.hololy.local/192.168.56.114
address=/api.tests.hololy.local/192.168.56.114
address=/api-int.tests.hololy.local/192.168.56.114
# 각vm의 dns설정(정방향&역방향모두)
dhcp-range=192.168.56.0,static
address=/master01.tests.hololy.local/192.168.56.201
address=/master02.tests.hololy.local/192.168.56.202
address=/master03.tests.hololy.local/192.168.56.203
ptr-record=201.56.168.192.in-addr.arpa.,master01.tests.hololy.local
ptr-record=202.56.168.192.in-addr.arpa.,master02.tests.hololy.local
ptr-record=203.56.168.192.in-addr.arpa.,master03.tests.hololy.local
address=/etcd-0.tests.hololy.local/192.168.56.201
address=/etcd-1.tests.hololy.local/192.168.56.202
address=/etcd-2.tests.hololy.local/192.168.56.203
address=/bootstrap.tests.hololy.local/192.168.56.200
ptr-record=200.56.168.192.in-addr.arpa.,bootstrap.tests.hololy.local
address=/worker01.tests.hololy.local/192.168.56.204
address=/worker02.tests.hololy.local/192.168.56.205
ptr-record=204.56.168.192.in-addr.arpa.,worker01.tests.hololy.local
ptr-record=205.56.168.192.in-addr.arpa.,worker02.tests.hololy.local
# 각 vm의 mac주소와 사용할 ip
dhcp-host=080027DA1D1A,192.168.56.200
dhcp-host=0800270A0E32,192.168.56.201
dhcp-host=080027FCB60E,192.168.56.202
dhcp-host=0800279E2B84,192.168.56.203
dhcp-host=52:54:00:00:00:21,192.168.56.204
dhcp-host=52:54:00:00:00:22,192.168.56.205
# file서버(tftp)
enable-tftp
tftp-no-fail
tftp-root=/var/lib/tftpboot
dhcp-boot=pxelinux.0그다음 tftp를 설치해줍니다.
$ yum install syslinux-tftpbootpxelinux.cfg폴더를 만들어주고 해당 폴더로 이동합니다.
$ mkdir /var/lib/tftpboot/pxelinux.cfg
$ cd /var/lib/tftpboot/pxelinux.cfg
$ vim default
default파일에는 bootstrap, master, worker가 사용할 kernel파일과 initramfs, 그리고 image url 등을 따로따로 기입해줍니다.
DEFAULT bootstrap
TIMEOUT 20
PROMPT 3
LABEL bootstrap
    KERNEL /pxelinux.cfg/4.3.8/rhcos-4.3.8-x86_64-installer-kernel-x86_64
    APPEND ip=dhcp rd.neednet=1 initrd=/pxelinux.cfg/4.3.8/rhcos-4.3.8-x86_64-installer-initramfs.x86_64.img coreos.inst=yes coreos.inst.install_dev=sda coreos.inst.image_url=http://192.168.56.114:8080/rhcos.raw.gz coreos.inst.ignition_url=http://192.168.56.114:8080/4.3/bootstrap.ign
LABEL master
    KERNEL /pxelinux.cfg/4.3.8/rhcos-4.3.8-x86_64-installer-kernel-x86_64
    APPEND ip=dhcp rd.neednet=1 initrd=/pxelinux.cfg/4.3.8/rhcos-4.3.8-x86_64-installer-initramfs.x86_64.img coreos.inst=yes coreos.inst.install_dev=sda coreos.inst.image_url=http://192.168.56.114:8080/rhcos.raw.gz coreos.inst.ignition_url=http://192.168.56.114:8080/4.3/master.ign
LABEL worker
    KERNEL /pxelinux.cfg/4.3.8/rhcos-4.3.8-x86_64-installer-kernel-x86_64
    APPEND ip=dhcp rd.neednet=1 initrd=/pxelinux.cfg/4.3.8/rhcos-4.3.8-x86_64-installer-initramfs.x86_64.img coreos.inst=yes coreos.inst.install_dev=sda coreos.inst.image_url=http://192.168.56.114:8080/rhcos.raw.gz coreos.inst.ignition_url=http://192.168.56.114:8080/4.3/worker.ign
물론 kernel과 initramfs파일은 mirror서버에서 다운받아서 경로에 둬야합니다.
$ cd /var/lib/tftpboot/pxelinux.cfg/4.3.8

$ ls
rhcos-4.3.8-x86_64-installer-initramfs.x86_64.img  rhcos-4.3.8-x86_64-installer-kernel-x86_64
준비가 끝났으면 dnsmasq서비스를 start시켜줍니다.
$ systemctl status dnsmasq
그 다음, 설치할 vm을 power on 시켜주고 VirtualBox기준 f12를 연타합니다.
그럼 다음 페이지가 뜨는데 여기서 LAN부팅을 선택하시면 됩니다.
다음 나오는 페이지에서는 어떤걸로 부팅할건지 선택해야하는데 시간이 지나면 default인 bootstrap으로 설치를 진행하기 때문에, 이 페이지에서는 tab을 눌러 자동으로 넘어가는걸 방지하고 선택하도록 합니다.

그리고 쭈주죽 설치를 진행하시면 됩니다.
훨씬 간편하고 잘못설치했을때 여러번 타이핑할필요없이 간단한 방법이니 한번씩 써보시길 바랍니다.
다음 포스팅에서는 OCP4를 설치할때 만났던 오류들과 해결 방법에 대해서 올리겠습니다...ㅎㅎ
끗!
'IT Note > Cloud' 카테고리의 다른 글
| Openshift Authentication (0) | 2020.06.27 |
|---|---|
| Openshift4.3 Installation on Baremetal -Errors (0) | 2020.05.27 |
| Cloud 기본 개념 파헤치기 - (2/3) 최근 동향 (0) | 2020.04.30 |
| Kubernetes Monitoring - Prometheus 실습 (0) | 2020.04.01 |
| Kubernetes Monitoring - HPA 실습 (0) | 2020.04.01 |


